Tampilkan postingan dengan label iii. Tampilkan semua postingan

Selasa, 05 April 2016

Let There Be Light Part III


This is part III of a III part series read parts I & II here.
I began working on the light ring stand at about 8:30 pm. It had to be completed that night, for in the morning it was to leave on a cross country drive. If that deadline wasn’t enough, it was also the first night of the newly resurrected #woodchat. Besides making the stand, I was tweeting and Google+ Hangouting for much of the night.To construct the base, I used a 1” thick, factory made sheet of finger jointed pine. I find that using sheets like this for non-decorative pieces is cost effective and the boards I rip from these sheets are much straighter than dimensional lumber would be.
The partially assembled light ring stand.
The entire stand is made from strips, about 2” thick, except for the upper half of each leg. As I ran out of the 1” think sheet and it was 10:30 at night by that point, I used the only dimensional lumber I had in the shop, pieces of 2”x4” Timberstrand to make the tops of the legs. Almost all of the joinery is made using T-nuts, 5/16” threaded rod and plastic knobs for easy breakdown. I set the T-nuts and install short pieces of threaded rod in each, secured with LocTite Threadlocker. Luckily, I had Ari around to cut the threaded rod lenghs for me while I fabricated the stand. The only permanently attached pieces are the receivers for the legs, where are permanently screwed to the feet.
The completed light ring stand with the light ring in place.
The stand is assembled with clamps as the LocTite was not yet dry.
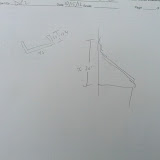
When assembled, the stand is about 7’ high and can hold the light ring, centered at any height from about 3’6” to 6’9”. The light ring is simply placed against the upper legs of the stand and ring’s handles are clamped to the stand using small quick clamps.
To use the light ring, simply stand behind it, and take your photo through the ring, so that your subject is evenly illuminated on every side of the photo.
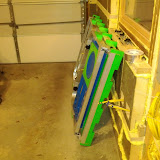
The stand, broken down and ready for travel.
Broken down, the stand is made of up 9 pieces, none longer than 4’. Though I didn’t have time to do so before the light ring and stand left of the west coast, I told Ari that if I picked up some large Velcro straps, it would make the stand easier to transport.
The light ring is now at home in LA, and its cooking with gas.
The light ring is now in LA, and soon it’ll be illuminating the stars.What odd projects have you made to meet your friend’s needs?
Let There Be Light: Part I
Let There Be Light: Part II
Read More..

Selasa, 22 Maret 2016

The Penultimate Renovations Contiue

Heres a quick video updating everyone on the recent (small) progress made on the continuing phase 1 of the shop renovation. Ive finally finished the window and electrical frames for the interior layer of insulation and now Im beginning to insulate around them.
Read More..

Selasa, 08 Maret 2016

The Ply Wooden Boat Part III Construction

We the boat materials purchased, I returned from Lowes. Back in the drivechoice of the cabin we stay at I set up the saw horses (to realize I’d miscounted 2”x4” and only had enough to make them 24” wide) and got to work.
First I sat on and “tested” one of the plywood pieces which I had ripped to about 30” (I think that’s right, but I should have taken notes) to make the bottom of the boat. I wanted to go wider than the 24” that GardenFork.tv did in order to displace more water and provide more buoyancy. I sat on that piece and pretended to row, testing that it was an appropriate width.Once I had settled on the width I reviewed the boat bottom with my cousin Robert (who was kind enough to help record the video along with my cousin Nick) we decided that it should have some taper to it at the bow and stern. I marked out the shape with the chalk lines and the casket shape of the boat was arrived on.The next step was to install the battens which fit where the sides meet the bottom. I used a scrap of CDX to mark out the width of the sides and then used relative dimensioning to size the batten pieces. Each batten piece was sat in a double bead of M-1 sealant and screwed to the base using the Kreg screws.
Robert carefully considers the shape of the hull.
With battens installed, I cut the sides. Because of the casket shape I couldnt simply use a single, flat side piece as the GardenFork.tv boat had. Rather than make three (3) pieces per side and have that many more battens to install and joints to waterproof, I simply made kerfs in the inside face of the walls at the angle changes. When the sides were screwed to the battens, they formed around the shape of the bottom (though the cupped in slightly at the top).
Once the base was cut to size, the sides where the next to be assembled..
Next came the stern, which was a simple square piece of CDX. Because it was square, I used it to help fight the cupping that bending the sides had created. The stern was installed by seating it in more M-1 and screwing into battens between the stern and bottom and the stern and sides.The bow was installed similarly, though because it was installed at 45° to the bottom it took a bit more fudging to install and had much more cupping of the sides to deal with.
With the sides, stern and bow installed, it was time for a snack.
Once the sides were all attached, I installed a batten around the top outside edge to stiffen the sides and provide a lip to hold and carry the boat with. I also installed a batten across the top from side to side. This batten was to hold the sides apart and further reduce the cupping at the top of the sides that had resulted from bending them around the casket shape of the bottom.
Some gentle clamp pressure helped un-bow the sides so that I could install the cross batten.
The last step of construction before waterproofing was to add a keel. My keel is relatively small and oddly constructed. The bracing all around it was necessary to avoid screwing into the ?” edge of the plywood. At home, I probably would have dominoed it on. On vacation I had to settle for the Kreg screws (but no Kreg jig) I had brought with me.
Keelly.
More (Ply)Wooden Boat posts.
Read More..

Selasa, 01 Maret 2016

The Sch?rch For Great Marquetry

Last weekend was Woodworking in America 2012 Midwest. Between WIA and hurricane Sandy, it’s been hard to get to posting. I’m going to try to a make up for that by sharing all that I can about WIA and the great woodworkers we met there.
We are the Modern Woodworkers Association. Meet us when you can.
Since I was busy manning the Modern Woodworkers Association booth, I wasn’t able to partake in classes at WIA as much as I’d hoped too. Luckily, the first class I took was worth many.
Paul Schürch, Master Marquetry Guy
Marquetry for Furniture by Paul Schurch was a fantastic introduction to marquetry. Paul took us through his journey of discovering marquetry and wading through the many choices of doing it until he found his own. While continually reminding us that there were many choices to do it, and all were perfectly valid, he emphasized that his method of “packet cutting” was what worked for him.
I’ll admit that I’ve not given much thought to marquetry before this class. That said, Paul’s artistry and easy explanation certainly make is seem within reach for anyone with even modest experience to try.
One of Pauls beautiful, marquetried tables (photo from his website)
Paul, of course, has a full featured web site (http://www.schurchwoodwork.com/) with instruction, DVDs & marquetry supplies. As it happens, his book/DVD combo pack is currently on sale at Shop Woodworking. Its a great set for anyone interested in marquetry.
editors note - after this post was written, but before I published, Paul-Marcel of Half-Inch Shy posted a great blog and video about Paul. Its nicer than this post and well worth the read.
Read More..

Minggu, 28 Februari 2016

Covering a Window Well

This weekend I made a quick project for a friend. Its a cover to fit over one of his basement window wells. Its designed to allow light to come in, but keep rain and snow out.
The wooden carcass for the window cover.
To make the well, I built a simple frame from 1/2" plywood. To join the frame, I used sections of dimensional lumber and screwed both faces in, rather than try to pocket screw or screw into the end grain of the thin, 1/2" plywood. The back of the frame was cut as an inverted "U" shape so as not to block the water. On the top, pitched surface I installed 1-1/2" wide strips to support the Lexan top. I place one of these strips on each end and one in the middle.
Fabricating the aluminum was much easier using commercial equipment
such as this finger brake.
Once the wooden carcass was done, I then clad the sides and front apron in .040 aluminum. The aluminum extends 2" down passed the sides and front to lap over and seal the joint between the wooden window well cover carcass and the masonry window well. I also covered the center support strip. It didnt need the aluminum from a waterproof perspective, but I though the clean white surface looked much better than plywood. To fabricate the aluminum, I used our commercial sheer and brake at work. Using commercial sheet metal equipment is much faster and cleaner than forming each piece by hand. Once formed I attached each piece to the carcass with neoprene gasketed stainless steel screws.
I was careful not to crack the Lexan when I drilled out for the fasteners.
When I installed the Lexan top, I ran a thin bead of M-1 sealant under each side to seal it. Since its a water shedding design, the bottom didnt need to be sealed. The overlap at the bottom is sufficient to keep water out.
At the top edge the aluminum trim fits over, rather than under, the Lexan to shed water.
Dry fitting the cover over the window well.
The entire assembly rests loosely on the existing masonry window well. In order to keep water which may run down the wall from running behind the cover, as separate, nail-on counter-flashing was installed on the wall. Its sealed with a non-curing butyl mastic under compression and more M-1 to prevent water entry.
The nail-on counter-flashing is the only part actually attached to the house.
The top trim of the window well cover extends behind it.
The top of the cover extend behind the nail-on counter-flashing. This properly sheds water while allowing the cover to be removed if and when its necessary.
The completed cover, installed over the window well.
This wasnt the most existing of woodworking projects, but I did get to use my track saw and I do like working with sheet metal. Most importantly, its a simple project that should help my friend out and keep his basement dry.
Basement Window Well Cover
Read More..

Selasa, 23 Februari 2016

BenchMark Table Review

I typically do more home improvement then woodworking. Both are rewarding. Home improvement usually wins out because it address a specific need or deficiency that everyone in the house agrees about. To date, Im the only family member that finds deficiency with our furniture.
The BenchMark Table
When I work on home improvement (and woodworking) my shop usually spills out into my drivechoice. I typically schlepp wooden, metal or plastic saw horsed (I have all three) around from the back of the house where they live and create an ad-hoc work material support system.When I first read about the Benchmark table on ToolRank.com I immediately thought I’d found my solution. It was a collapsible aluminum table that could easily be setup in the drivechoice and maybe even the shop too.
The table, on arriving in the shop.
The table is a bit pricey ($350.00 to $500.00). At first I didn’t question the cost, I just needed to save up to get it. Following my birthday I put together all the Amazon gift cards I got (the only thing I’d asked for), added a bit of my own cash and pulled the plug on the table.
These are the plastic end caps which I broke a few of.
Once I received the table, I did second guess the price as I was assembling it. While the instructions are clear and easy to follow, the little green pieces that line the edge were a bit tricky to install. BenchMark is nice enough to include 4 extra, but I broke all of them during the installation. Because one of the cross pieces and the aluminum angle that makes the side weren’t lining up square to each other, I actually kept screwing right through the green plastic bit, tearing through it’s base. Even after I switched from a screw gun to a screw driver, I still damaged one. Finally, on the last little green plastic piece I went ever-so-gentle and managed not to break it. Luckily, it’s holding so well now that I’ve forgotten which one gave me so much trouble.This bit of frustration, on an otherwise easy assembly, did lead me to question the cost. For hundreds of dollars I was expecting an issue free assembly.
It fits, but it takes up just about all the currently free space in the shop.
I was also a bit disappointed by the relative size. In my one car garage shop, the table is big (64.25"L x 37.5"W) and not really practical to use (as I’d hoped it would be). However, when moved to the drivechoice, it shined.
The drivechoice is much less then flat. The adjustable feet make it easy to
keep the top of the table flat. They adjust in mere seconds.
When setup in my very uneven drivechoice, the table was very stable. The adjustable feet meant there was no wobble and I was easily able to adjust any twist out of the top.
A full sheet of any sheet good is handled with ease.
Once I threw a full 4’ x 8’ sheet of ¾” OSB on the table, I knew it was worth it. Since then, I’ve put full sheets, partial sheets and boat loads of PVC trim on the table. Through everything, the table has been absolutely rock solid. No matter what I’ve done with it, I’ve not been able to make it wobble. This was one of my prime concerns and the reason I’ve alchoices stayed achoice from the Festool Multi-Function Tables. I’ve played with MFTs many times in multiple stores, and they alchoices wobble.
It handles doors with east too.
Itll handle long boards too (with a touch of support).
I’ve now had the table for a bit more than 2 months. I’ve found that the table excels as a work surface. I don’t mean to suggest it’ll replace a real work bench, but as a surface to cut, drill and mark pieces and especially as a work surface for general home work (rather than fine woodworking) the Benchmark table is fantastic. If you find yourself needing to set up, breakdown and move your work table the Benchmark is the choice to go.Editors Note:Rusty asked to see photos of the table folded up (which I should have included originally). Thanks for the request, Rusty. Here is the entire photo gallery, including the table folded and in storage.
BenchMark Table
Read More..

Shop Tour M Scott Morton Part II

Pickup up where we left (Part I) off in Mortons shop at the sliding compound miter saw corner, if you then turn left, and run along the wall opposite the door, you’ll find his SawStop Cabinet Saw and his dust collector. While the saw stays set there against the wall, the dust collector does occasionally move, as it’s not permanently connected to most of the stationary equipment.
The router table, OSS, storage cabinet and bench lumber.
Moving passed the saw, the next corner is occupied by Morton’s Ridgid oscillating spindle sander (OSS) and Bench Dog router table. A storage cabinet of small draws rests next to the OSS and the lumber for Morton’s future bench lays next to the router table. On the walls above, a very small window frame and adjacent former window frame serve as cubbies to store toolboxes and other small items.
Notice how Morton takes advantage of the recess in the wall to
achieve a great deal of storage with no floor footprint.
Rounding the OSS and router table corner brings us along Morton’s storage wall. He took advantage of a recess in the the middle of this wall section to build a storage rack for his Festool collection (bigger than mine, I’m pretty sure) and clamp racks. Because of the the recess in the wall, none of these racks steal valuable floor space.
Storage on the back of the shelves in the "dead end" section of the shop.
If we stay along this wall and follow it to the end opposite the OSS, we’ll find a dead end created with the installation of shelves between a column and the wall between the shop and family room. Both sides of this “dead end” are used for storage. Some of it (like his utility and sharping bench) is kind-of organized. Some of it is not.
As we all do, Morton has shelves in his shop that hold a bit of everything.
The kind-of organization also extends to the opposite side of the shelves. They house old tools, light fixtures, wine and all sorts of others, miscellaneous stuff. Moving passed the shelves brings us back to the shop entry door and through it, the family room.As I mentioned above, Morton has the lumber for his new bench acclimating in his shop now. Like many of us, he’s caught the winter 2011/2012 workbench building bug. For now, he makes his torsion box assembly table serve double duty as a bench. It’s a fairly function bench, with a typical metal face vise and plenty of storage beneath that dead flat work surface.
The existing, torsion box bench.
Between his lumber storage, equipment, assembly table and future bench, Morton’s shop is a high functioning woodwork space that’s proofing perfect for producing his high quality custom furniture.p.s. - since my visit in November, Morton has added a small child’s bench area to the shop for his kids. You can check out his post about it here.
Read More..

Senin, 22 Februari 2016

My Own Treehouse of Horror


This weekend I managed to get some solid, yet frustrating work done on the tree house.
The Treehouse.
Before winter set in I was able to get most of the sheathing done. All except for the gable ends. So, thats where I began.
This first side was a piece of cake.
The first side, the front, went easily. A few quick measurements and a track saw make quick work of accurate cuts, even when a single piece of sheathing tucks beneath both roof angles resulting in a complicated shape.
This piece, it didnt fit so well on the 1st, 2nd or 3rd try.
Alas, on the second piece of the rear side (the 4th of 6 total) I measured correctly and then proceeded to cut the piece incorrectly, and then incorrectly again, and again. Finally on the fourth try, I got it right. It turned out, I was measuring using my 26" square. While the square is dead accurate, its important to reference the measurements on the correct side or else the measurements will be off by the width of the square blade.
Thats a lesson learned & a piece of T1-11 wasted. Hopefully its now back to accurate cutting.
Read More..

Kamis, 18 Februari 2016

A Rack For Her Glue Gun Part III

After shaping with power tools and rasps, the glue gun rack was left with a very coarse surface. I struggled with this surface for a while. I tried random orbit sanders. They didn’t work. The sculpted surface was too irregular and the pads didn’t rotate properly. I tried hand sanding. This was too much like work.
Not the smoothed finish right off the grinder.
Thankfully, Paul Lemiski of Canadian Woodworks came to the rescue with his recommendation of using my Rotex with 60 grit paper in Rotex mode set to speed 1. It took the rasp marks off better and quicker than any other method I’d tried.
The work horses of my sanding regimen.
Once the surfaces were smooth, I sanded it up to 220 using a combination of my RO 90 and sanding pads.
With the final shaping and sanding done, it was now time for finish. Rather than shellac - which has become my go to finish as of late - I used General Finishes Arm-R-Seal and the method explained in The Wood Whisperer’s Simple Varnish Finish DVD. I used gloss for the first two (2) coats and semi-gloss for the third. I sanded between coats with 00 synthetic steel wool and the final coat with 0000 synthetic steel wool. This left a warm and deep tone to the Walunut.
The last step was to insert the tile. To do this I squeezed a bit of silicone marine adhesive on the back of the tile and pressed it into the recesses I’d made before the glue gun rack was assembled. After spending a night under a clamp, it was done.
Just waiting for the glue to dry.
I presented it to my wife as a gift on our 11th anniversary. She’s taken to using it, and the desk and rug are now glue free.
The finished Glue Gun Rack (poorly photographed).
Additional:
Glue Gun Rack Photos
Glue Gun Rack Posts
Dont forget about the +Modern Woodworkers Association Podcast. We talk woodworking with Guests from around the world of woodworking every other week. Subscribe to the RSS feed or iTunes today.
Read More..