Tampilkan postingan dengan label penultimate. Tampilkan semua postingan

Senin, 28 Maret 2016

Shop Tour Mike Pekovich Part I

Mike Pekovich’s shop is a model of both woodworking and building efficiency. More than just the Art Director for Fine Woodworking, Mike is one of the most productive and efficient woodworkers I know. His shop, in the detached two-car garage behind his suburban Connecticut home, it the front-line tool in his efficient work.
The Pekovich Workshop
You first realize that there’s something special about Mike’s shop even before you enter. As part of his 2011 total shop renovation Mike built new, insulated doors from scratch. In one garage bay opening, he made traditional barn doors. In the other he made fixed panels to narrow the width and then set a standard, insulated exterior door between the panels. The custom doors and panels were built utilizing wood frames filled with polyisocyanurate insulation and skinned with plywood. The outside of the doors are trimmed in a traditional arts and crafts door pattern.
The work Mike did on his doors is representative of the entire shop. Between his CMU block exterior and 1/2” drywall interior, Mike has built the walls with 2”x3” and 2”x4” framing, filled in with a double layers of 11/2” polyisocyanurate insulation. This gets his walls to about R-20. When combined with the insulated ceiling and floor the well insulated walls allow a simple propane heater and window air conditioner to keep the shop toasty in the winter and cool in the summer.
Looking down the table saw at the outfeed table and planer.
Within the shop Mike’s big equipment - his jointer, planer and table saw - make up an island in the center. Each tool is arranged to provide optimal infeed and outfeed space without interfering with the adjoining tools. A small dust collector fits between them to capture most of the dust coming off the jointer and planer.
A workbench completes the island. This is Mike’s secondary bench. It serves as a table saw outfeed table, assembly bench and auxiliary workbench. Mike is really fond of this arrangement, and I must say I agree. Given my small shop space, I’m going to have to make my outfeed table serve double (or triple) duty too.
Chisels at the ready, and natural light abounding,
theres work to do on the workbench.
The walls of Mike’s shop are lined with benches and countertops. When you first walk in the passage door, Mike’s main, custom made workbench is on the right. It’s a little bit sorter than most at 60 inches, but it fits the space nicely and serves as sturdy work holding platform (even if Mike would like to upgrade the vises). Above his bench is the custom tool cabinet. A clamp rack fills the final bit of wall space between the tool cabinet and the inside corner.
Continuing in a counter-clockwise path around the edge of the shop to the back wall, you’ll next encounter a bank of drawers capped with a countertop which rests in the corner. The counter holds his oscillating spindle sander and Tormek. It serves as the sharpening station. A small wall cabinet above the counter holds the sharpening supplies.
The sharpening bench.
Next up along the the back wall are Mike’s hollow chisel mortiser and his new pride and joy - the propane heater. Having worked out of a cold shop myself, I can fully appreciate the value of that heater and why Mike is so fond of it.
You cant be productive if youre cold.
A good heater is critical during Connecticut winters.
The final wall (before we get to the front wall made up of doors) houses another bench. This one holds Mike’s vintage Buffalo drill press, his belt/disc sander and his miter saw.
Mikes Buffalo drill press is awesome - and older than I am.
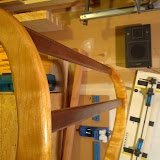
Along the final, front wall the bandsaw lives between the door openings.
A new and awesome bandsaw.
When we toured Mike’s shop in Feburary of 2012 he was working on a cabinet project. You can imagine how quickly large plywood carcasses will fill up a shop that’s already stuffed with equipment as Mike’s is. But that’s ok. What’s a great shop for if not for filling with tools and projects?
Some of the cabinets Mike was working on when we visited.
Youll find out more about Mikes shop in Parts II & III, so stay tuned.
Read More..

Rabu, 23 Maret 2016

Penultimate Woodshop Renovation Video 11

Its been a hectic few weeks here. While I cant say its been busier than usual, my holiday schedule has been a lot less predictable.
The caddies and my messy bench.
Thankfully, Ive been able to sneak in a bit of shop time. After finishing my wifes Tin Can Caddies & the Wand Racks, I had a clean(ish) bench and it was time to get back to work on the shop.
The insulation it coming.
I didnt get too much done, but I did get the rigid polyisocyanurate aboard up. Hopefully Ill also get the spray foam done to air seal it before I have to go back to work.
One schedule I did keep during the holidays was our regularly scheduled MWA podcast. For the audio, check out iTunes or the MWA page.
I hope all my fellow woodworkers had an enjoyable and productive holiday season.
Read More..

Selasa, 22 Maret 2016

WIA11 A Whole Bunch of Photos

Last year at Woodworking in America, I took far too few photos. This year I managed to take a whole lot more. Though I still think I may not have taken enough, here are the photos Ive taken.
Some of these folders only contain a few images, but hopefully they convey the great time we had at WIA11.
Woodworking in America 2011 Photos:
Blogger Community Party
The Maloof Leg-to-Seat Joint w/ Charles Brock
WIA Marketplace
Hand Tool Olympics
Secrete Drawers & Hidden Compartments w/ Charles Brock
Nailed Furniture of the 18th Century w/ Adam Cherubini
Hofbrauhaus
Rabbets, Dadoes & Grooves by Hand w/ Adam Cherubini
Tradition Improved Lie-Nielsen Toolworks w/ Thomas Lie-Nielsen
Chisels Through Ancient Eyes w/ Adam Cherubini
Blue Shirts
Embassy Suites Happy Hour
Pompilio
Behle Street Cafe
Rob Bois, Woodworking Underwear Model & Bad Axe Tenon Saw Winner
Read More..

The Penultimate Renovations Contiue

Heres a quick video updating everyone on the recent (small) progress made on the continuing phase 1 of the shop renovation. Ive finally finished the window and electrical frames for the interior layer of insulation and now Im beginning to insulate around them.
Read More..

Kamis, 03 Maret 2016

2013 February Shop Tour

With the coming of the new month comes a new shop tour. While most of my January 2013 shop time was devoted to Pinewood Derby Cars and other Cub Scout related activities, I did manage to get a little bit done on the wall insulation and the Ghetto WorkCenter Boom Arm.
Here is part 2 of the 2013 monthly shop tour series: 2013 February Shop Tour.
Read More..

Sabtu, 20 Februari 2016

Racking The Quilts Part II

The first bit of proper fabrication on the Quilt Rack was to joint the feet to the legs. I did this using my Domino XL. In order to accommodate the curves they would later be shaped to, I had to use different length Dominos. This is the first time I’ve used the XL. It’s a wonderful beast. Given the size (and especially the length) of the available 14 mm Dominos, the feet should stay attached to the legs for a very long time.
Those Dominos for the Domino XL are awfully big.
After the Dominos were mortised I assembled the leg/foot assemblies and clamped them each up with a single parallel clamp. I handled glue squeeze out using the method advocated by Marc Spagnolo, waiting about 20 minute and scraping it off after it’s initially gelled.
My roofing Barret knife makes is a great all around knife.
Once the leg/foot assemblies came out of the clamps, I transferred the cross member locations to the boards using my stop rules. I didn’t actually mark or transfer the Domino mortise locations, just the outline of the square (not yet rounded) cross members.
Stop rules were used to transfer the cross member locations.
To mill the Domino mortises in the legs, I clamped a piece of wood to the leg even with the edge of the cross member to act as a fence. Then I set the base of the domino against the fence, centered it on the width of the cross member and mortised. To mortise the cross members, I used the Domino Trim Stop for Narrow Stock. Because the legs are only about ?” thick, I made the mortise deeper in the cross member than in the leg.
 I clamped a block of wood to the leg to act as a fence to reference the Domino off of.
With the joinery done, Part III will move on to shaping.
Quilt Rack Photo Gallery
Read More..

Jumat, 19 Februari 2016

Penultimate Woodshop Renovations

It’s been a busy few weeks at the Punltimate Woodshop. I’ve been hanging over at the Modern Woodworkers Association as of late. We’ve had much going on with our promotion deal for Woodworking in America and we’ve been working to negotiate a successful truce between the online woodworking community and Fine Woodworking.While I havent had time to write much, I have snuck into the shop now and then to keep the renovation moving forward (even if very slowly). Here are my latest accomplishments on assembling the shop wall.
Read More..

Sabtu, 13 Februari 2016

A House In The Trees Part X

With full sheets of the upper roof done, its time to finish up with the partial sheets and sheath the lower roof.
I also detail how unlike the upper roof, the synthetic underlayment for the lower roof gets properly attached, as it will remain under the roof.
If youve missed a post, you can catch up on the Tree House here.
Read More..