Tampilkan postingan dengan label v. Tampilkan semua postingan

Minggu, 03 April 2016

Stephens Step Stool Part V

With the entire step stool now glued up I realized I hadn’t cut feet yet. I took my Lee Valley Drawing Bow and marked out a subtle curve in the middle of each leg. Once I cut out the curve with a jig saw, it left two (2) feet on each leg.
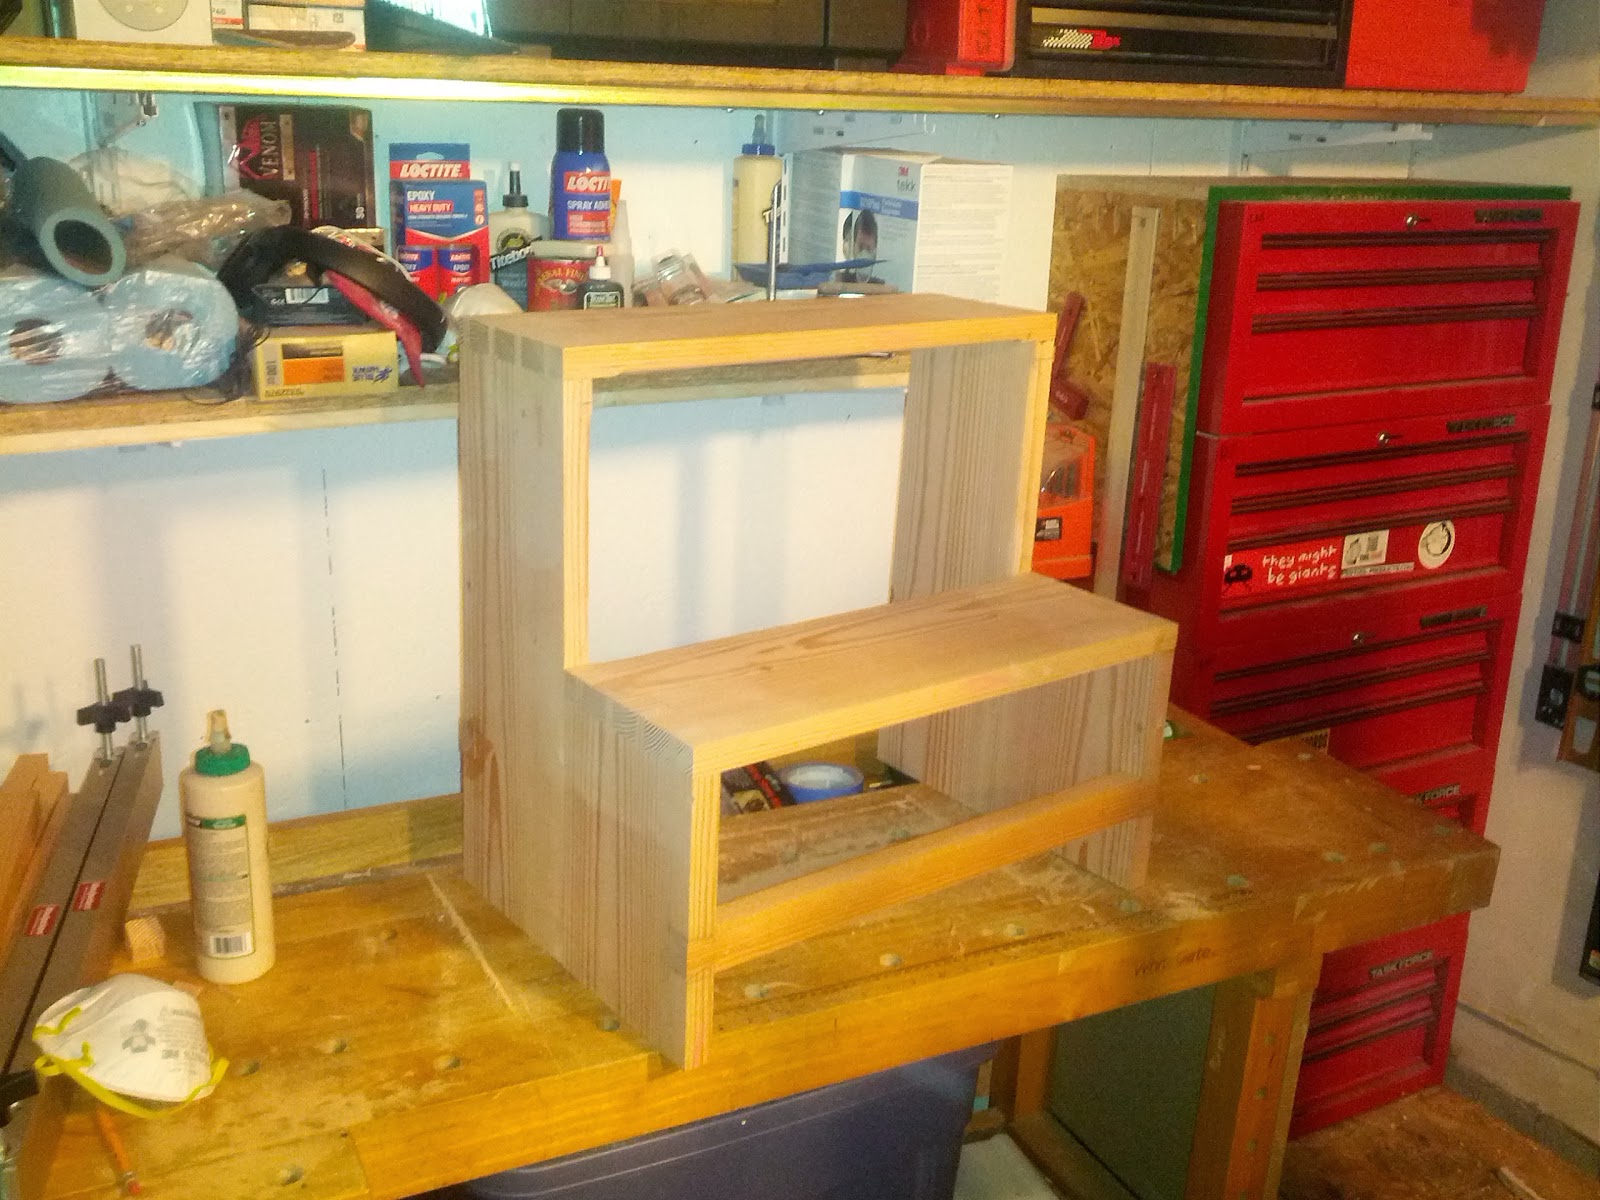
All ready for  feet.
Now with feet I took the step stool over to my router table. After the nasty incident with my neighbor during this stage of my last project, I setup my router table inside this time.
I removed the fence and used a bearing guided ¼” radius roundover bit, I ran every reachable edge of the stool (except the bottom) over it. This method took a bit of getting used too. With a bit of practice I soon found it easy as the stool is not so big as to hang completely off the router table yet is big enough to provide plenty of reference and holding surface.
Its starting to look curved.
Fresh off the router table the stool (or any piece having this roundover method used) is rounded, but not done. The routed curves on the edges are hard, disjointed and where they do flow into each other they have a shallow, machine cut look. I only use the router to hog off most of the waste, not to provide my final edges. After routing it is time for rasping.
My arsenal (and some additional).
As I’ve grown to enjoy the process and results of using rasps, my collection of rasps has grown. As I’ve used them more and more, favorites have emerged and others have fallen out of use. On Stephen’s Step Stool I did all my initial rasping using my Shinto 9” rasp. Though amazingly cheap, the woven blade is exceptional at coarse and medium rasping with efficient chip removal. Unlike other cheap rasps I’ve used, the Shinto does not leave tooth tracks (due to the woven blade).
The Shinto is wonderful at coarse work.
Next I used my Auriou #9 Cabinet Makers rasp. The Auriou further refines the curves while taking the coarse surface left by the Shinto and smoothing it to a much more consistent surface. Finally I used my new Gramercy 5” 25 tpi cabinet makers rasp. This Gramercy is delightfully light and leaves a very smooth surface (for a rasp).
With all the rasp work I do my goal is to further refine and flair the curves. I want them be organic, flowing and invite touch.
As transformative as the rasps are, even fine rasps leave a surface too coarse for finish. When I’m done with the rasps I switch to my Rotex sanders. I use an RO 125 and an RO 90. When setup on Rotex mode with an 80 or 120 grit sanding pad and set to speed 1, they do a wonderful job of removing the rasping marks. They also use the Festool Interface pads which allow the sanders to wrap the rounded edges and prevent flattening.
Gaps? What gaps?
After sanding the curved edges I added blue Transtint dye to 5-minute epoxy and filled in the few big gaps in the dovetails. Once the epoxy was dry I took out the sanders again, this time sanding the entire stool. I currently sand up through 220 grit, though I’m not completely satisfied with my sanding results. I’m not sure what changes I’ll make, but I’m considering going much higher in grit.Find all of the Step Stool posts here.
Dont forget about the +Modern Woodworkers Association Podcast. We talk woodworking with Guests from around the world of woodworking every other week. Subscribe to the RSS feed or iTunes today.
Read More..

The Ply Wooden Boat Part II Planning Materials

The boat they made on GardenFork.tv, which I was using as the basis for my design, was made of a single sheet of plywood. It was about 24” wide with sides about 12” high. Though Eric from GardenFork.tv is a trim guy, his narrow boat road very low in the water when he launched it as a solo passenger. As I wanted to be able to take my kids (and even other adults) in the boat with me, I decided I would need two (2) sheets of plywood.
With this as a plan, I headed straight to Lowes once we were settled in at Lake George (and I was back from the trip to Fine Woodworking Live I made immediately after arriving).
Yep, thats what a boat looks like before its put in the water.
Since the ¼” luan I used on the mock boat was awfully damn thin, and the plywood bottom would need to support me, I opted to use ?” CDX plywood. Though it was bowed and coarsely textured as most CDX is, I felt it provided me the best mix of strength, weight and cost. For the battens, I chose to switch to 2”x2”, so the tips of the screws wouldn’t poke through the ¾” thickness of the 1”x used in the mock boat. I also bought some 2”x4”, metal saw horse brackets and a small drop cloth so I could work at a comfortable height and keep the mess in check.
Ready for ripping!
In the parking lot, I had to rip down the 4’x8’ sheets of plywood before they would fit inside my truck. This being upstate New York, there was no problem woodworking in the parking lot.More (Ply)Wood Boat Posts.
Read More..

Sabtu, 02 April 2016

Ghetto WorkCenter Boom Arm Part V The Second Video

This second Ghetto WorkCenter video shows the completed WorkCenter. After making the saw tray and boom arm I kept going and moved on to make a tool holder. As I documented in my last post, I made the Tool Holder by coping the V design of the Festool Tool Holders. I made mine of wood and it mounts on the Ghetto WorkCenter. Now I can hang two tools on the WorkCenter while keeping the saw off the ground and the hose out of the choice.
Read More..

Kamis, 31 Maret 2016

The Ply Wooden Boat Part V Sailing The Sea

Now that the boat was built and waterproofed, the only things left to do before it’s maiden voyage were to take it to the lake, and determine how I would propel it. I, of course, decided to take it to the lake first, and fabricate its means of propulsion in the parking lot next to the beach.
Have boat, will travel.
While Eric used a single oar for his GardenFork.tv boat, I found that with the increased width of my boat it was too wide to use a single oar effectively. I made two (2) oars (like a traditional row boat) instead.
I built the oars in the parking lot at the beach.
I attached the U-shaped oar pivots on the dock.
The oars were cut to length on the dock too.
The finished oars.
Making the oars was as simple as cutting a rectangle of scrap ?” plywood, trimming the corners off and then screwing it to a 2”x2”. To act as oar pivots, I cut two U-shaped pieces of plywood and screwed them to the outside face of the batten with ran down the top of each side. The oars simply dropped in the opening, which was cut with enough room to allow the oars to move.
Finally, ready for the open sea.
Finally, the boat (dubbed the S.S. Sea Man) was ready to set sail.My cousins, Doug and Robert, and I carried it passed the rocks (Lake George is beautiful, but lacks sandy beaches) and into the water. I gave it a brief moment to confirm it was watertight. Then I hopped in and I set off rowing.
Row like the wind.
The boat was in and out of the water for three (3) or four (4) days over the course of our vacation. It proved a stable craft. My kids (and cousin) enjoyed going out on the boat and it proved a stable platform for launching firecrackers. I was able to successfully carry two (2) adults and probably could have managed a third.
I did ultimately get the hand of steering it with the oars.
After the first day, I moved the cross batten further back to reduce the number of times I hit my knuckles on it while rowing. That made it better, but not great. In the end, what kept the boat’s use down were the unbearably uncomfortable square oar handles and the cramps I managed to get from the lack of a seat.
To move the batten back, I first added a new one, then removed the old one so the boat sides wouldnt spring  back together.
I managed to row a good choices into the lake. Had a had a destination, I may have gone further.
Come aboard, were expecting you.
From the boat, I was able to get the usual great views of the lake and shore.
A panoramic taken with my phone from the boat.
Though it was my intention to scrap the boat after the vacation was over, my Dad seemed to have taken a liking to it and offered to store it at his barn in Greenwich, NY until next summer. That, of course, has me thinking. I already know how I’ll be adding seats and a better pivot mechanism for the oars next year.
The boat survives, to be sailed again next summer.
While there are inherent risks in boating of any kind, and this isn’t a project you should take on without considering those risks, I’d highly encourage building a plywood boat of your own if you get a chance. The one featured on GardenFork.tv is very straightforward to build (just leave out the bottom window) or embellish it as I did. Either choice, there’s nothing like the feeling of sailing the open seas heading to Mexico in boat you crafted with your own hands.
Read More..

Sabtu, 26 Maret 2016

Grandpas Workshop in Greenwich

With his seminal work Workbenches: From Design and Theory to Construcion and Use, Christopher Schwarz had me hooked. It is a fantastic tome about workbench theory. Within my limited workbench use Ive come to agree with virtually every point Chris makes about the design & use of workbenches.
The Cover, in its wonderfully decorated glory (image from the Lost Art Press site).
With the later release of The Anarchists Tool Chest, I strayed from the choices of the Schwarz. I could never wrap my head around using a chest in a shop as small as mine. Floor space is far too precious to waste on a tool chest when a tool cabinet frees up the floor and keeps the tools closer to hand. As for the philosophy of a limited tool kit espoused by The Anarchist’s Tool Chest, I own 10 routers. Need I say more?
A fuzzy photo of Chris holding court in my kids Grandpas workshop with fellow
woodworkers at the Northeast Woodworkers Association Showcase 2011.
It was in that mindset of respecting Chris’s projects while not thinking they were for me that his publishing house, Lost Art Press, printed the English translation of Grandpa’s Workshop by Maurice Pommier. Initially I was uninterested in Grandpa’s Workshop, thinking it was simply the French children’s version of The Anarchist’s Tool Chest.
Wesley in my shop.
I began to warm to the idea of Grandpa’s Workshop when I saw many glowing mentions of it by my friends on twitter and google+. When I met people singing the book’s praises at Woodworking In America, I decided to walk across the aisle of the marketplace and finally buy a copy.I’m glad I did. So are my kids.
My Kids Grandpas Workshop, filled with the Long Island Woodworkers Club
during the Northeast  Woodworkers Association Showcase 2011.
I was initially taken by the beautiful illustrations of Grandpa (Pèpère Grosbois) and his tools. It was once I sat down and read the book with my three (3) sons that I really fell in love with it though.
The stories that the tools tell are so captivating, fanciful, pragmatic and instructive that even my 4 year old’s attention was held through the entire 48 page book (read over 3 sittings). The tools tell of history, use and the often tragic lives of the Grosbois family that owned them. By the end of the book you feel you know Pèpère as well as the young narrator does. You’ll also know what all the tools are and what they do.The translation from French by Brian Anderson is wonderful and captures the poetic nature of the text (not having read the original French I assume this to be true, otherwise Anderson added poetry to the English, either choice, its poetic).The illustrations are the perfect compliment in tone to the text. Through images large and small, in full color and in silhouette, the action of the text plays out across the pages for all to see.
Pèpère shows the besaiguë to Sylvian (image from the Lost Art Press site).
For any woodworker with children, Grandpa’s Workshop is a must have. Even for woodworkers without children, it’s a great tale of the tools we use and some of the people who’ve used them.After enjoying Grandpa’s Workshop so much, I feel I may have to revisit the Anarchist’s Tool Chest. While I don’t think I’ll be taking my tools down off the wall, there may be more to the Anarchist woodworking philosophy than I had given it credit for.
Read More..

Minggu, 06 Maret 2016

Ghetto WorkCenter Boom Arm Part II The Video

Earlier in the week, I began my series on my Ghetto WorkCenter Boom Arm. Its my homemade version of a boom arm and platform that fits on the systainers that fit on my vacuum.
I was hoping to finish the description about the Ghetto WorkCenter Boom Arm before I posted the video, but Im down with a cold, so heres the video (its an easy post to write). Ill get back to the construction in my Monday post.
Do you have a boom or hook to keep your vacuum hose out of the choice?
Read More..

Sabtu, 05 Maret 2016

Its A Community Build A Ghetto WorkCenter

I saw this great tweet from +Michael McCormick on Saturday.

I love it when I see that Ive been able to help and inspire another woodworker.  Thank you, Michael.
If youd like to see more on the original, my Ghetto WorkCenter, you can catch up here.
Dont forget about the +Modern Woodworkers Association Podcast. We talk woodworking with Guests from around the world of woodworking every other week. Subscribe to the RSS feed or iTunes today.
Read More..

Kamis, 18 Februari 2016

The Woodworking Shows Are Back!

This year the Woodworking Shows are under new ownership with renewed energy, enthusiasm and excitement.
Every year the Woodworking Shows visit my neck of the woods when they stop in Somerset, NJ. Ive attended almost every show there for the last decade. In that time the quality of the show has moved decidedly downhill, the number and quality of the vendors has shrunken and it has gone from a full day to a few hour affair.
2 years ago, Andy and I were able to hang out and talk chair making.
There was a highlight two (2) years ago when Andy Chidwick traveled with the show, giving lectures and generally spreading woodworking enthusiasm. Even then the atmosphere was less than exciting though.
This year, under their new management, the Woodworking Shows have rebounded and are well on the choice to their former glory. Andy is back teaching about design and his wonderful sculpted woodworking. Jim Heavey, Paul Sellers, Roland Johnson, The Crazy Canadian and others are packing the lecture spaces also. Woodworkers are excited to attend and partake.
Where else can you see a cool bench like this, other than the Woodworking Shows.
There seemed to also be more vendors this year, and the vendors seem to be of higher quality. Companies like Woodpeckers, Arbortech and Clear Vue Cyclones were worth attendance alone.
The sense that I, and that the other attendees I spoke with, had is that the shows are back. The energy, enthusiasm and excitement are returning. The fun day of woodworking education, tool test drives and comradery is here again.
If you see this trailer, go in and check it out.
If the Woodworking Shows can maintain this return to form, next year will be a must attend. Check their calendar and see when theyll be near you. Itll be a worthwhile day.
Read More..

Selasa, 16 Februari 2016

Dads Benchtop Bench Part V

With the bench built, all that was left was to screw in the two veneer press screws which held on the front vise jaw.
The completed benchtop bench.
While they fit fine, I unfortunately found that once I tightened them, the handles came off the screw shaft. It seemed that since they were meant to exert pressure between the vise nut and the end of the screw shaft, Shop Fox hadnt bothered to attach the handles with anything more than friction.
Nope. That handle wasnt meant to exert clamping pressure.
While the discovery of this issue after I thought I was done did give me pause, I thought about it for a night and by morning I’d come up with a solution.
The pins and drill bits. I only needed 2. I bought 4 just in case.
Locked and ready to drill.
I headed down to the hardware store and picked up some metal pins. After drilling through the handle and screw shaft with my drill press, the pins were easy to knock in with a hammer.
Locked and ready for action.
Once the handles were pinned on, the vise worked great.
Clamping like a champ.
I’m very happy with the choice the benchtop bench came out, and my Dad appreciated it as a father’s day gift.
Read More..

Racking The Quilt Part V


To finish the Quilt Rack I first installed a pan head screw in the bottom of each foot point to hold it just above my protected table saw surface and allow me to easily finish it without resting the foot on wet finish.
This choice the wet finish doesnt stick to the drop cloth.
Since I was short for time and only ended up with one day to apply finish, I used Bull’s Eye Sealcoat shellac. With the help of Kenneth’s great Woodshop Widget app, I was able to mix up .5 lb and 1 lb cuts of shellac (it’s a 2 lb cut in the can).
Shellac, post cutting, ready to be applied.
First I applied two (2) coats of .5 lb cut and then 10 of 1 lb cut. I spaced the coats about an hour apart and applied them all with a rag. Between the first few coats I sanded with 00 synthetic steel wool to get the rough spots out. After the final coat, I rubbed it out with 0000 synthetic steel wool.
As the coats went on, the "flame" really began to show.
I managed to finish it by about 9:30 the night before the party. This meant I was actually around the day of to help instead of being holed up in the shop frantically trying to finish. The quilt rack was a wonderfully received surprise. I’m happy to say it made my mother-in-law the envy of all the old quilting ladies in attendance. In fact, the quilt rack was received so well, I’ll be making a second one for my wife’s aunt this fall.
A poor photo of the beautiful finished quilt rack.
The formal presentation, tears from the recipient and fondling by the other sewers in attendance.
The quilt rack in its new home.
Quilt Rack Photo Gallery
Read More..

Jumat, 12 Februari 2016

A House In The Trees Part V

Progress on the Tree House has progressed at a steady (and slow) rate.
The 3/4" x 12" beast.
I began the actual site work for the tree house by setting the large bolts that will support it. The bolts are critical because they must not only be strong enough to hold up the Treehouse, they must also allow free movement between the trees and the Treehouse in order to accommodate movement of the trees. After I had installed the first few bolts, I looked at the physical space outlined by the three (3) trees I planned on using and realized that I wasnt happy with the size of shape.
In this video, I  describe the change in shape and the replacement of a 10" bolt with a 12" bolt in order to accommodate the fact that the bolt will no longer be perpendicular to the beam.