Tampilkan postingan dengan label wia13. Tampilkan semua postingan

Rabu, 30 Maret 2016

Lee Valley Tools At WIA13 Episode II First Project

When I first posted about the videos from WIA, Lee Valley had just released their first and I included it.
They have just released their second, video from the conference. This time, find out what we all made as a first project.
Dont forget about the +Modern Woodworkers Association Podcast. We talk woodworking with Guests from around the world of woodworking every other week. Subscribe to the RSS feed or iTunes today.
Read More..

Senin, 28 Maret 2016

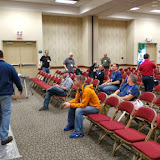
Looking at WIA13

While I didnt shoot much video, I did take lots of photos at Woodworking in America 2013.
Here then, are my albums from the weekend. Click on an album for all of the photos.
MWA Meetup
WIA13 MWA Podcast
WIA13 Online Woodworking Roundtable
WIA13 Roy & the MWA
WIA13 Chairs Style & Substance w Ejler Hjorth-Westh
WIA13 Working with Curves Design & Execution with Ejler Hjorth-Westh
WIA13 Marketplace
Timber! at WIA13 with Roy Underhill
Dont forget about the +Modern Woodworkers Association Podcast. We talk woodworking with Guests from around the world of woodworking every other week. Subscribe to the RSS feed or iTunes today.
Read More..

Sabtu, 12 Maret 2016

Stephens Step Stool Part IV

With the steps and legs joined I turned my attention to the stretchers.
The legs are glued to the steps.
The stretchers are made from the 1" thick stock I milled for the steps and legs during the milling process. I began by ripping two (2) pieces to about 1¼” width.
Next I took two (2) scrap pieces and cut them to be the exact length between the sides, where the sides meet the steps. I fit these pieces between the legs at the base of the stool in order to hold them parallel (they were angled in, so the legs held the spacers under compression without clamps).
With the legs held parallel by the spacers, I used an adjustable square to mark up from the bottom evenly on both legs. I didnt go for a particular measurement. I aimed for about 1/3 of the choice up. The square ensured that the marks on both legs were even with each other. I followed the same process to mark out for the back stretcher, making it about 1½” higher (by eye) than the front stretcher.
The stretcher blanks were laid across the legs, with the bottom edge of the stretchers even with my marks. Then I marked the top of the stretcher on the legs and the inside and outside of the legs on the stretchers. I cut the stretchers to length at the outside edge of the leg marks. Then I used a bevel gauge and laid out a single tail on each end, extending from the inside leg mark to the end of the stretcher. I cut down the side of the tail with my dovetail saw, then I scored the shoulder line with a chisel and cut it with the saw too.

The "pins".
Once the tails were cut, I laid the stretchers back down in place on the legs and marked the pins (it’s really just a single negative tail, but for the sake of clarity, I’ll call it the pins). The sides of the pins were cut with my dovetail saw and I chiseled out down to the base.
Hand cutting dovetails is not an operation I do often, so their fit was gappy. It was nothing a little epoxy wouldn’t fix later.
Not the prettiest, but itll do.
As I had done with the steps and legs, I took the stretchers to the router table and rounded over the edges that I would not be able to reach once the step stool was assembled. Then I glued in the stretchers with NexaBond. Actually, I installed the front stretcher before I remembered I should have rounded it over. This left me more work to do with the rasp and resulted in the back edge not being as evenly rounded as the others. Be sure to round over your unreachable edges before assembly.
For previous Step Stool posts, click here.Dont forget about the +Modern Woodworkers Association Podcast. We talk woodworking with Guests from around the world of woodworking every other week. Subscribe to the RSS feed or iTunes today.
Read More..

Selasa, 16 Februari 2016

Stephens Step Stool Part II

I made Stephen’s Step Stool from Douglas Fir. Our big box stores do not carry the fabled Southern Yellow Pine, so I settled on our local (not-so)equivalent.
I laid out the parts between the knots on the boards and cut them using my jig saw. Because the 2”x12”s were 10’ long, I cut them on the floor using scraps of wood to hold them up and provide blade clearance.
The 2” x 12” we used was wider than my 8” jointer so I flattened the faces with the planer alone. Once each piece was cut to length there was minimal bowing. The pieces were first fed through my planer with their concave side down. They were then continually passed through the planer, alternating faces between passes, until the board where reduced from 1½” to 1” thick.
Stephen proved a great help during the milling as he was able to keep an eye on the ClearVue cyclone attached to my shop vac and let me know when it began to clog. Planing ½” of thickness off of 11½” wide boards made about 45 gallons of chips.
After thicknessing the boards I finished milling them by flattening one edge on the jointer and then cutting to width on my table saw. Once milled and dimensioned we stickered them and called it a night.
Dry fitting before joinery.
The following day I cut the dovetails using my Keller 2200 Journeyman Dovetail Jig. Some of the boards had cupped slightly, but I was able to clamp them up tightly and the dovetails cut reasonably well.
Milling the pins.
Then I glued the front and rear sections of each side together using Nexabond glue. Since using it in my clamp rack I’ve been impressed with Nexabond’s performance. Hopefully +Christopher Adkins will mail me my WIA Nexabond soon.
While the glue on the sides dried, the remaining pieces spent the night re-stickered.Dont forget about the +Modern Woodworkers Association Podcast. We talk woodworking with Guests from around the world of woodworking every other week. Subscribe to the RSS feed or iTunes today.
Read More..