Tampilkan postingan dengan label stools. Tampilkan semua postingan

Kamis, 31 Maret 2016

More Stools pt3

  • Part 1
  • Part 2
Ok ... next comes the leg bracing for our stools. Each stool will have a lap jointed brace across each pair of opposing legs (Ill call it a side brace) and a longer single brace that runs down the center that is lap jointed into the side braces. Make sense?.... Hmn... maybe better explained in pictures.
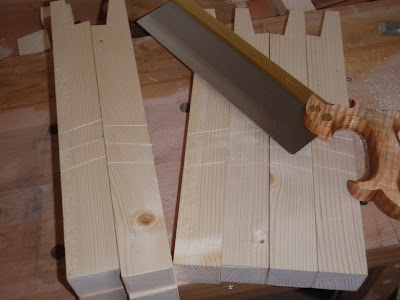
First, the lap joint sockets need to be marked in the legs.
After marking out using the knife and being careful to get the complimentary 10 degree splay angle in the correct direction, I pared the cut lines with a chisel, before making three cuts per socket to help allow the waste to be easily removed with a chisel.
Two stools with four legs each, times three cuts per leg equals twenty four cuts to be made just for half a lap joint. What seems like an easy process seems to take me a lot longer than I think it will. Its easy to kill a few hours and not achieve an awful lot of progress...
Using the vice to hold the stock flush with my marking lines, I used the smaller chisel to remove most of one side of the socket to the center.
Then I flipped the work piece around to do the other side.
Then used the large chisel places directly in the baseline, using the vice jaws to keep the chisel face flat.
Finally finishing off by hand and paring achoice any roughness.
Now it was back to the bench hook to cut four lengths of wood, two braces per stool.
I placed the square braces directly into the sockets in the legs and marked out the joints to be cut with the seat top attached using a pencil. It was nice to see the pencil marks agreeing with both my square and bevel gauge almost exactly, meaning my joints must be acceptable and the stool is remaining pretty square.
Its actually starting to look a bit like a stool... The center brace (just sitting in place in the picture above) is nice and straight forward with the joints cut at a sensible 90 degrees and therefore there is no messing around with bevel gauges. A couple of minutes center finding using dividers, some squared lines with the knife and a few strokes of the saw and a bit of chisel work later ...
We have a stool! On my previous stool I cut the center brace flush with the side braces, but this time I thought I would try and make a feature of the end grain of the center brace which in turn will result in a stronger joint. In fact, even without any glue I was able to sit on the stool - albeit very carefully!
So ... Now repeat all the above for the other stool. *Sigh* I kind of wish I had done one stool at a time now as the progress would have been a lot faster. Its surprising how much time it takes to build such a simple little project.
Still to do:
  • Bevel and smooth all the edges and surfaces.
  • Dry fit and final trimming of joinery, before glue up.
  • Flush cut all the joints and trim the legs to match the splay angle so the feet sit square.
  • Sand and finish.
Stay tuned...
Read More..

Sabtu, 26 Maret 2016

LN 5pc Bevel Edge Chisel Set


With some well earned cash in my pocket I have decided to treat myself to a long awaited indulgence - A 5pc set of Lie Nielsen Bevel edged chisels complete with the leather tool roll. 
After some discussion with a few other woodworkers whos opinions I have come to value, I decided to opt for the O1 tool steel, over the A2 steel. As I do a lot of stuff with soft Pine, Im hoping the lower 25/30 degree bevel of O1 steel will be more suited than using a 30/35 degree bevel as required with A2 steel.
These Lie Nielsen chisels will replace my cumbersome Stanley Fat Max chisels, for finer joinery like dovetails etc. The Stanley chisels will still earn their living doing DIY type chores around the house & garden. Each Lie Nielsen chisel feels so light and balanced in the hand, I am sure they are going to be a joy to use - as are all my other LN tools.
The sizes are 1/8", 1/4", 3/8", 1/2", and 3/4". The leather roll, while expensive is very nice quality and well made and really completes the set. Having space for seven chisels allows me to also store my two LN mortise chisels making a really nice set.
Im gonna need (to make) a bigger tool box soon...
Read More..

Jumat, 18 Maret 2016

Rabbet Joint Box

While making the simple bevelled wall board for my Ships Clocks a few days ago, it occurred to me that the very same design might make a good (albeit chunky) box lid. 
My stock (scaffold board Pine - of which I have a lot of it!) wood is around 1 1/2" thick, the simple design allows me to use what I have without having to waste most of the wood making it thinner. It also saves me a lot of sweat with a hand plane!
It also occurred to me that I have never made a simple Rabbet jointed box...
I completely forgot to take any pictures during the build as things progressed pretty quickly. A rough description of the steps I took are below:
Box Carcass
  • Cut four pieces (2 long , 2 short) of cheap (pre-planed) Pine to length on the bench hook.
  • Shoot them to exact lengths with square ends on the shooting board.
  • Mark and cut the shoulder line of each rabbet on the short sides of the two long boards (the front and back of the box) again using the bench hook - 2 rabbets per long board.
  • To form the actual rabbets, I first tried using my small shoulder plane with a wooden baton clamped in place to keep me straight, but this proved to be quite slow. For the three remaining rabbets, I simple used my dovetail saw to cut down the end grain (much like sawing a tenon), finally cleaning the joint up with the shoulder plane. In retrospect, I should have (been brave) tried to remove the waste with a chisel which would probably been even faster than sawing.
  • Use a plough plane to cut 1/4" grooves in the bottom of the boards for the base to fit into.
  • Cut a thin plywood board to size for the box bottom.
  • Glue the carcass together.
  • Plane the edges and joints flush and generally tidy it up.
The Lid
  • Approximately cut to length a piece of rough scaffold board.
  • Assess the board for grain direction and use winding sticks to check the wind and straightness of the board. Pencil in notes on the board as to what work is likely to be required and where.
  • Plane one face flat using my no#6 and mark it as a reference.
  • Hand plane the adjacent long edge straight and at 90 degrees to the first face and mark it.
  • Use a marking gauge to mark all around the edges of the board to get it to uniform thickness again using the no#6 to remove wood fast.
  •  Use a marking gauge to mark the second long edge parallel to the first.
  • Precision cut the board to the required length and ensure it is square.
  • Mark bevel lines all around the board using a marking gauge. Used my no#4 plane to create the bevels, being careful to finish the short end grain sides first.
  • Fit small brass hinges and apply some wax finish...
While the box does look rather like a coffin for a small dog or a cat, it was very enjoyable to make with most of the project being completed in a single day. Rabbet jointed boxes come together pretty fast! Not as nice looking or as strong as a dovetailed box, but I did learn from it and at this stage thats the most important aspect for me.
 
 
More simple projects to follow ...
Read More..

Senin, 07 Maret 2016

This week The Woodpecker makes step stools