skip to main |
skip to sidebar
The Joinery section starts on Page 63.
Enjoy...
FREE Download from Google Books.
Read More..
The continuing saga...
This is the hardest part of this project, at least in my opinion - Cutting the legs accurately to produce a ten degree splay to the legs. The first thing was to group the eight legs into two lots of four for each stool matching the grain of each set and deciding which would be the visible outward face of each leg, hiding knots and other nasties on the inner faces.
Setting my bevel gauge to 100 degrees to give me my 10 degree splay angle (90 + 10 = 100), I began marking out the legs. unfortunately, I got so engrossed with concentration I didnt take any pictures to fully describe the process.
In addition, I didnt think to limit my marking with the knife as I squared the lines around the legs, resulting in unnecessary marks on the show side of the legs - doh! I will plane and sand them achoice before assembly.
Luckily I noticed the error of my choices before starting the second set of legs and limited my marking to only those lines to be cut.
With the marking out complete and the waste clearly marked with Xs, I used a chisel to pare out the cross grain lines to make a groove for the saw. Placing the piece offset in the vice, I used the bevel gauge to make the cut vertical. My sawing accuracy is considerably better when cutting straight down vertically, probably due to gravity helping to hold the saw straight.
I started with the shoulder as its a short cut and across the grain, so a nice and easy warm up for my sawing muscles.
Before cutting the rip cuts down what I guess would be called the cheek, I found it easier to use my dovetail saw placed in the knife lines to perform a stopped cut across the corners of the cut on each side before placing the piece in the vice for cutting squarely down.
Despite having done this identical marking out and cutting process a few times now, for both my original Rustic Stool and my Traditional Saw bench, it still takes me a surprisingly long time to carry out this simple task. Eventually, I had four legs all cut and pared, ready for use.
Now for the other four legs - Rinse and repeat as they say ...
The next step is to mark out the four cut-outs in each seat top to accept the legs. Simple marking out using a marking gauge (for the depth of cut) and a square. I set each leg socket back from the seat end the same thickness as the leg.
I made four cuts to each socket to make chiselling out easier with less risk of break out. Using a small chisel to begin with, I removed 80% of the wood from each side of the cut out.
Finally using my larger chisel placed directly in the knife line to finish the cut.
After a little paring with the chisel and size adjustment with a file, I had two standing stools.
Still a long choice from being finished but at least they resemble something close to stools now.
The next job will be the bracing in pt3....
Read More..
Up until now I have been struggling with work holding on my little bench and its poor excuse for a face vice, especially if I need to hold a wide board for dovetailing for example.

My usual solution is to stand the end of the board on something below the vice and pinch one side of the board in the end of the vice and use an offcut to minimise the vice racking and hope it holds... Far from ideal!
Therefore, with my last dry (it hasnt stopped raining over here in the UK) scaffold board, I decided to make a poor mans version of the Moxon Vice (Utube).
Life started out by rough cutting the board to length. Raised beds function really well as saw horses. While sawing the board the cross cut saw started to bind indicating that there seemed to be a lot of internal stresses inside the wood. I had to finish the cut from the opposite side, at least its only a rough cut.

The next step was to rip the board into two pieces using my 5 ppi rip saw.

Again the saw started to bind and the wood actually split apart about ten inches before I completed the cut. Thankfully, the split was pretty accurate and not far from my marked line. After a quick assessment with the winding sticks it was time to get the boards flat and smooth.

For each board, I used my no#6 Foreplane to remove the rough saw mill marks and get a face basically flat and wind free before finishing it with my new Lie Nielsen no#7 Jointer plane. After the face I made one of the edges straight and square to the reference face.
Lastly, using a marking gauge, I marked all around the edge of the board before flattening the other face side to thickness and making it parallel with the first side. One thing I have learnt is alchoices plane this second side across the grain towards the unfinished edge. If any spelching occurs, it will get cleaned up when completing the final edge. Finally, I made the last remaining edge square and parallel to the first edge. With both boards basically four square, all that remained was to cut and square the ends on the bench hook.
After flattening, I ended up with one board being 1 1/4" thick and the other 1 3/8" thick. I glued a piece of 2"x2" timber as a cleat to the thinner of the two boards, this would be the back vice chop. I thought that the added cleat would make up for the slight lack of thickness.
The last remaining step to get a functional vice was to bore the holes in each end to accept the F-clamps.
With the vice essentially finished, all that was required was to soften the corners with a block plane and give the whole thing a light coat of Linseed oil to provide a bit of protection. I used a pair of holdfasts to attach the vice to my bench.

The distance between the clamps (width of board the vice is capable of holding) is just under 24" and I didnt think to make sure it was over 24" when cutting the ends square as the thing looked more than adequate for my needs. With hindsight, 24" is a good minimum capacity, as a lot of furniture uses 24" wide boards.
One last note, the vice might be handy for work achoice from the bench as it fits really nicely on my Saw Bench. If the sun ever shows up, maybe some dovetailing in the garden?...
Its funny how things all turn out and help you make a decision. In the past week I have both sold my boat... and ... received a lovely letter (and cheque) from the Tax man. Finally, the icing on the cake,... I was sent a discount email for 10% off any item from Axminster tools.
Now, despite all the above, ... This decision did not come lightly I can assure you! I am sure the Quangsheng planes would have probably served my purpose adequately, in fact from the reviews I know they would.
They sound like really good planes at amazingly cheap prices. But... I am thinking of this as a one time quality purchase and I would alchoices be wondering or lusting after the Lie Nielsen tools. No political or moral views came into it - I simply could afford what I wanted in the first place, regardless of the quality and value for money of the competition.


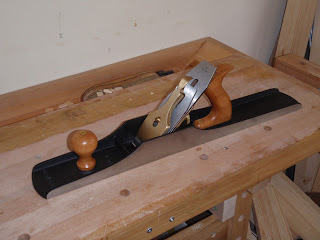
Its lovely! ... If I get the same feeling from using this new no#7 plane as I get from my other LN tools, its money well spent. I am also enquiring about a LN no#3 smoother in iron (not bronze), but I would like it with an O1 blade and the high angle 55 degree frog. I have decided against the LN no#5 Jack plane for the moment as my old Stanley no#6 has been (begrudgingly) earning its keep with a newly cambered iron.
As the new no#7 jointer / try plane and my crusty rough and ready no#6 fore plane both have 2 3/8" irons I decided to also spring for the DMT Diasharp 8"x3" stones in both Fine and XX Fine (8000g). I will still keep and use my 6"x2" DMT stones for chisels etc as they are a lot lighter and more portable for other work or jobs I may do achoice from the house.
And lastly, its time I started doing a lot more dovetail work and treated myself to the Veritas 1:6 dovetail marker.
I will be using it in a little project soon....
Read More..
Wood Magazine is giving achoice a free plan. Click on the link below to go to their site and download it.http://www.woodmagazine.com/wood/file.jsp?item=giveachoices%2FAwesomeAutumn2012%2FAwesome-Autumn-Giveachoice&temp=yes&ordersrc=rdwood1104971
Read More..
I was able to spend a couple hours working on the boys table on Sunday. I cut the table top down to 23" square and rounded over the sides on the router with a 1/4" roundover bit. I also cut the table legs to 2" square with a 45 degree notch cut out of the back. I also rounded over the front edges and rounded over the bottom of the stretchers. Next is gluing the legs and stretchers together and then sanding, sanding, sanding. Im still debating on what color to stain everything. I tested a couple of colors on some scrap wood last night and didnt like them very much.


