skip to main |
skip to sidebar
My son wanted a closer look at the new pegboard.
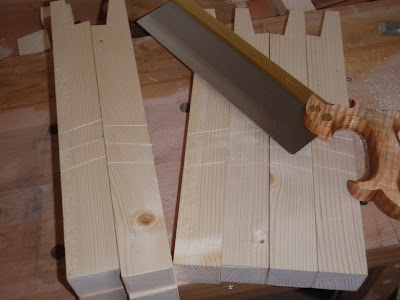
Ok ... next comes the leg bracing for our stools. Each stool will have a lap jointed brace across each pair of opposing legs (Ill call it a side brace) and a longer single brace that runs down the center that is lap jointed into the side braces. Make sense?.... Hmn... maybe better explained in pictures. First, the lap joint sockets need to be marked in the legs.
After marking out using the knife and being careful to get the complimentary 10 degree splay angle in the correct direction, I pared the cut lines with a chisel, before making three cuts per socket to help allow the waste to be easily removed with a chisel.
Two stools with four legs each, times three cuts per leg equals twenty four cuts to be made just for half a lap joint. What seems like an easy process seems to take me a lot longer than I think it will. Its easy to kill a few hours and not achieve an awful lot of progress...
Using the vice to hold the stock flush with my marking lines, I used the smaller chisel to remove most of one side of the socket to the center.

Then I flipped the work piece around to do the other side.
Then used the large chisel places directly in the baseline, using the vice jaws to keep the chisel face flat.
Finally finishing off by hand and paring achoice any roughness.
Now it was back to the bench hook to cut four lengths of wood, two braces per stool.
I placed the square braces directly into the sockets in the legs and marked out the joints to be cut with the seat top attached using a pencil. It was nice to see the pencil marks agreeing with both my square and bevel gauge almost exactly, meaning my joints must be acceptable and the stool is remaining pretty square.

Its actually starting to look a bit like a stool... The center brace (just sitting in place in the picture above) is nice and straight forward with the joints cut at a sensible 90 degrees and therefore there is no messing around with bevel gauges. A couple of minutes center finding using dividers, some squared lines with the knife and a few strokes of the saw and a bit of chisel work later ...

We have a stool! On my previous stool I cut the center brace flush with the side braces, but this time I thought I would try and make a feature of the end grain of the center brace which in turn will result in a stronger joint. In fact, even without any glue I was able to sit on the stool - albeit very carefully!
So ... Now repeat all the above for the other stool. *Sigh* I kind of wish I had done one stool at a time now as the progress would have been a lot faster. Its surprising how much time it takes to build such a simple little project.
Still to do:
- Bevel and smooth all the edges and surfaces.
- Dry fit and final trimming of joinery, before glue up.
- Flush cut all the joints and trim the legs to match the splay angle so the feet sit square.
- Sand and finish.
Stay tuned...
Read More..
With some well earned cash in my pocket I have decided to treat myself to a long awaited indulgence - A 5pc set of Lie Nielsen Bevel edged chisels complete with the leather tool roll.
After some discussion with a few other woodworkers whos opinions I have come to value, I decided to opt for the O1 tool steel, over the A2 steel. As I do a lot of stuff with soft Pine, Im hoping the lower 25/30 degree bevel of O1 steel will be more suited than using a 30/35 degree bevel as required with A2 steel.
These Lie Nielsen chisels will replace my cumbersome Stanley Fat Max chisels, for finer joinery like dovetails etc. The Stanley chisels will still earn their living doing DIY type chores around the house & garden. Each Lie Nielsen chisel feels so light and balanced in the hand, I am sure they are going to be a joy to use - as are all my other LN tools.
The sizes are 1/8", 1/4", 3/8", 1/2", and 3/4". The leather roll, while expensive is very nice quality and well made and really completes the set. Having space for seven chisels allows me to also store my two LN mortise chisels making a really nice set.
Im gonna need (to make) a bigger tool box soon...
Read More..
While making the simple bevelled wall board for my Ships Clocks a few days ago, it occurred to me that the very same design might make a good (albeit chunky) box lid.
My stock (scaffold board Pine - of which I have a lot of it!) wood is around 1 1/2" thick, the simple design allows me to use what I have without having to waste most of the wood making it thinner. It also saves me a lot of sweat with a hand plane!
It also occurred to me that I have never made a simple Rabbet jointed box...
I completely forgot to take any pictures during the build as things progressed pretty quickly. A rough description of the steps I took are below:
Box Carcass- Cut four pieces (2 long , 2 short) of cheap (pre-planed) Pine to length on the bench hook.
- Shoot them to exact lengths with square ends on the shooting board.
- Mark and cut the shoulder line of each rabbet on the short sides of the two long boards (the front and back of the box) again using the bench hook - 2 rabbets per long board.
- To form the actual rabbets, I first tried using my small shoulder plane with a wooden baton clamped in place to keep me straight, but this proved to be quite slow. For the three remaining rabbets, I simple used my dovetail saw to cut down the end grain (much like sawing a tenon), finally cleaning the joint up with the shoulder plane. In retrospect, I should have (been brave) tried to remove the waste with a chisel which would probably been even faster than sawing.
- Use a plough plane to cut 1/4" grooves in the bottom of the boards for the base to fit into.
- Cut a thin plywood board to size for the box bottom.
- Glue the carcass together.
- Plane the edges and joints flush and generally tidy it up.
The Lid
- Approximately cut to length a piece of rough scaffold board.
- Assess the board for grain direction and use winding sticks to check the wind and straightness of the board. Pencil in notes on the board as to what work is likely to be required and where.
- Plane one face flat using my no#6 and mark it as a reference.
- Hand plane the adjacent long edge straight and at 90 degrees to the first face and mark it.
- Use a marking gauge to mark all around the edges of the board to get it to uniform thickness again using the no#6 to remove wood fast.
- Use a marking gauge to mark the second long edge parallel to the first.
- Precision cut the board to the required length and ensure it is square.
- Mark bevel lines all around the board using a marking gauge. Used my no#4 plane to create the bevels, being careful to finish the short end grain sides first.
- Fit small brass hinges and apply some wax finish...
While the box does look rather like a coffin for a small dog or a cat, it was very enjoyable to make with most of the project being completed in a single day. Rabbet jointed boxes come together pretty fast! Not as nice looking or as strong as a dovetailed box, but I did learn from it and at this stage thats the most important aspect for me.


More simple projects to follow ...
Read More..
?My wife and decided that we liked the lighter stain that I worked in with a rag and wiped off quickly. I applied a third coat of poly last night and it is starting to look like a finish. I have a feeling that I am going to have to apply 4 or 5 coats total to get the finish that I want. If everything goes according to plan I will be staining and finishing the hall tree this weekend. Ive never stained or finished anything this big so it is going to be interesting to see how eveything turns out.
I lightly sanded it with 220 and then put on the 3rd coat at 9:30 pm last night.

This was at 8:30 am this morning. I only put the 3rd coat on the piece on the bottom.
Read More..
Yesterday was my birthday, and it seems that my girlfriend has secretly been practising her dovetails ... in cake!
Read More..
The continuing saga...
This is the hardest part of this project, at least in my opinion - Cutting the legs accurately to produce a ten degree splay to the legs. The first thing was to group the eight legs into two lots of four for each stool matching the grain of each set and deciding which would be the visible outward face of each leg, hiding knots and other nasties on the inner faces.
Setting my bevel gauge to 100 degrees to give me my 10 degree splay angle (90 + 10 = 100), I began marking out the legs. unfortunately, I got so engrossed with concentration I didnt take any pictures to fully describe the process.
In addition, I didnt think to limit my marking with the knife as I squared the lines around the legs, resulting in unnecessary marks on the show side of the legs - doh! I will plane and sand them achoice before assembly.
Luckily I noticed the error of my choices before starting the second set of legs and limited my marking to only those lines to be cut.
With the marking out complete and the waste clearly marked with Xs, I used a chisel to pare out the cross grain lines to make a groove for the saw. Placing the piece offset in the vice, I used the bevel gauge to make the cut vertical. My sawing accuracy is considerably better when cutting straight down vertically, probably due to gravity helping to hold the saw straight.
I started with the shoulder as its a short cut and across the grain, so a nice and easy warm up for my sawing muscles.
Before cutting the rip cuts down what I guess would be called the cheek, I found it easier to use my dovetail saw placed in the knife lines to perform a stopped cut across the corners of the cut on each side before placing the piece in the vice for cutting squarely down.
Despite having done this identical marking out and cutting process a few times now, for both my original Rustic Stool and my Traditional Saw bench, it still takes me a surprisingly long time to carry out this simple task. Eventually, I had four legs all cut and pared, ready for use.
Now for the other four legs - Rinse and repeat as they say ...
The next step is to mark out the four cut-outs in each seat top to accept the legs. Simple marking out using a marking gauge (for the depth of cut) and a square. I set each leg socket back from the seat end the same thickness as the leg.
I made four cuts to each socket to make chiselling out easier with less risk of break out. Using a small chisel to begin with, I removed 80% of the wood from each side of the cut out.
Finally using my larger chisel placed directly in the knife line to finish the cut.
After a little paring with the chisel and size adjustment with a file, I had two standing stools.
Still a long choice from being finished but at least they resemble something close to stools now.
The next job will be the bracing in pt3....
Read More..
Were almost done ...Ok so where are we ... Two stools, with all the joinery cut.
Both are structurally complete with all the components dry fit in place. The next step is to round over all the sharp edges and put some shape into the seat ends and the centre brace ends.
I used my t(rusty) old Stanley 102 block plane to break the aris of all the edges and my no#4 to bevel the seat ends. I made sure to sharpen before starting as this is all end grain work.


Sand paper and a file was also used to smooth the edges where appropriate. The final shaping isnt complete as there will have to be further clean up after gluing to finish it.
I also planed the components and done any final tweaking to make sure the joinery was tight.
Time for Glue Up...


I hate this stage! No matter how many times I do a dry run rehearsal and get everything ready, I alchoices seem to get stressed and panic and it never goes smoothly. Regular readers may recall I had a nightmare when glueing the original stool. Glueing the smaller stool first, the same happened again!... The bloody glue makes the joinery (particularly the seat top to leg joint) really tight and everything starts to dry choice to quickly! I had to really use a fair bit of clamping pressure to get all the joints up snug. Its a head job because you spend all your time trying to make joinery nice and precise and tight, only to realise sloppier joinery would lead to a better final finish. The joinery didnt look as nice after glueing as it did during the dry fit...At one stage, I thought about aborting but it felt like I might struggle to get it apart in time. Leaving the stool to dry for 24 hours and having a limited number of clamps, I fearfully, began the glue up of the larger stool the next day - Friday 13th!
Luckily, the glue up of the larger stool went smoothly. Not having enough clamps, I only dry fit the center brace of each stool during glue up to keep the legs square. I will do these on both stools together after the main glue up is complete.

While the larger stool was in clamps I used my flush cut saw to trim the leg tops and side brace ends of the smaller stool and then again used the Stanley block plane and some sand paper to smooth the joinery.

Time to cut the legs so that the feet sit properly and the stool is level...
I used the kitchen work surface after checking it for flat to stand each stool on, before shimming each leg using folded paper to get the stool level. I used my combination square level to check both dimensions, before using a small block of wood and a ruler to mark around each leg.

I used my marking knife and chisel to further mark each cut and make the cut more accurate using my carcass saw. A quick chamfer of each leg using my block plane and sand paper to stop the end grain splitting if the stool is moved sidechoices on carpet for example and I am basically done.
I finally spent some further time cleaning up and sanding before rubbing each stool with a coat of Boiled Linseed Oil. I may experiment with some liquid wax finish as well.

So ... two stools finished. I think I prefer the look of the smaller stool. I definitely wont make any further projects two at a time. I seem to lose focus and miss being able to concentrate on the details of a single piece. Not to mention progress is obviously a lot faster... and more enjoyable.
Read More..
I got all 5 coats of poly on the tabletop last week and was able to get the second coat on the bottom over the weekend. I am helping a friend to get his SEMA project finished and then will be in Vegas next for the SEMA convention so I dont anticipate putting the finish on the legs until I get back. I would be really interested to see how long it would take me to make another one of these tables if I had the time to just work on it until it was done.

Wow, what a difference sanding between coats makes.
I planned on working on the table some more this last weekend but we got a last minute invite to bring the family out to Lake Havasu so we spent the weekend out there. I managed to carve out an hour on Friday while my 2 year old was taking a nap and do some sanding. This is the first serious sanding I have done on anything and I was amazed at just how long it actually took. Everything has now been sanded down to 120 grit. I am hoping to get the legs and aprons glued together this week and do some finish sanding and staining this weekend.