Tampilkan postingan dengan label benchmark. Tampilkan semua postingan

Jumat, 18 Maret 2016

BenchMark Miter Saw Station Review

The BenchMark table is much improved with the addition of the Miter Saw Station.
The setup Miter Saw Station on the BenchMark table.
After my initial review, BenchMark sent me their new Miter Saw Station and asked me to take a look at it. I’m embarrassed to say how long it’s taken me to open it up and put it through it’s paces, but as it’s finally become warm enough to open the table up and work in the drivechoice Ive managed to finally get the Miter Saw Station setup.
The setup took about 20 minutes. Half that time was spent looking at photos of the setup miter saw station online, since my pre-production model didnt have enclosed instructions. With instructions, it would probably have taken less than 10 minutes.
The Miter Saw Station components come packed in single box.
The Miter Saw Station consists of three (3) main components. The center section holds the miter saw and the two (2) outer arms hold the work supports (which are capped with rollers). The outer arms slide onto the center section and then the whole assembly locks onto the BenchMark table, fitting into the recesses in the tables cross pieces.
The stability provided to the Miter Saw Station by fitting into the recesses is surprising and impressive. Though I didnt need it, there is also a hook which locks the Miter Saw Station in and prevents it from possibly lifting.
The combination of nesting in the recesses and hooking on makes for very solid attachment.
The miter saw is attached to the Miter Saw Station by means of two (2) rails. The rails are first bolted to the saw. Slots in the rails allow for saws with varying spacing between their front and rear attachment points. The rails then bolt to the Miter Saw Station. This time slots in the saw station allow for saws with varying widths between the left and right attachment points.
Attaching my Bosch GCM12SD miter saw to the rails using the included bolts took some nimble finger worker to get the nuts on the bolds within the tight space of the rails. Attaching the rails to the saw station was a bit easier as there was more room beneath the station than beneath the rails.
These nuts are a bit hard to reach.
The outer arms are made of square tubing They slide over smaller square tubing which is attached to either side of the center section. The outer arms have feet with lock into the BenchMark table and prevent the Miter Saw Station from moving side to side.
The outer arms lock into the outer edge of the table.
The work supports slide in and out and up and down. This is done with square tubes which fit within each other. There are locked into position with clamping teeth that push in from two (2) faces. This pushed the inner tube into a corner of the outer tube preventing it from sliding in and out and from twisting. When tightened the clamping teeth hold very tightly.
By pushing the inner square tube into the corner of the outer square tube,
the clamps lock tightly.
When I was attached the miter saw to the Miter Saw Station I tried to keep the saw square to the saw station. This was difficult, as there was no good reference to use. I thought it was important to keep the saw as square as I could because there are rollers on the top of the work supports.
As with roller supports for a table saw, the roller supports on the BenchMark Miter Saw Station will pull the work piece into or achoice from the saw fence if they’re not installed perfectly perpendicular. This is one part of the Miter Saw Station I wish BenchMark had done differently. I think low friction plastic pads such as those on Ridgid’s outfeed supports would have been much better than the rollers, because the plastic pads don’t pull the work piece in any direction, regardless of how they’re aligned.
If not aligned properly, I fear these rollers could pull the work piece
in or out and mess up the cut.
Once assembled, the Miter Saw Station allowed for quick and easy use of the miter saw. It turned the BenchMark table into a very nice portable miter saw stand. If the BenchMark table is already setup, I can not assembly and attach the Miter Saw Station in about two (2) minutes.
The fully assembled Miter Saw Station.
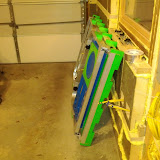
When the Miter Saw Station is not assembled, I leave the center section attached to my miter saw. It raised the saw up a few inches, but the bottom of the center section is flat and stable. The bulky outer arms are a bit harder to store. For now they’re resting on my shop floor against the wall. Ultimately I’ll probably find a choice to hang them.If I were only looking for a miter saw stand, I think the BenchMark table / Miter Saw Station combination would be overkill. However, as an existing owner of the BenchMark table, the Miter Saw Station is a wonderful addition. It quickly and solidly attached to the table. It provide good support for the saw and for long workpieces. When I’m done it comes off just as easily as it went on, allowing me to keep using the BenchMark table as the awesome work surface that it is.
Read More..

Jumat, 11 Maret 2016

Finally 1 Day Passes to Fine Woodworking Live

Last year I would have saved a lot of money if theyd offered 1-day passes to Fine Woodworking Live. It conflicted with my family vacation, and after paying for the whole weekend I had to go home on Friday night.
Im a die hard woodworking conference fanatic, so I knew what I was getting into when I bought the full pass. Still, I would have appreciated saving the $175.00 by only buying a 1-day pass.
Thankfully theyve just announced that 1-day passes are available for Fine Woodworking Live 2013. If youve been holding out because you cant make for the whole event and dont want to pay for the whole event, nows the time to book. Even if you just come for one day youll have a great time learning and hanging out with your woodworking friends (if your one day is Saturday, youll even see me).
Hopefully thell let idiots into the conference in 2013 too.
Read More..

Minggu, 28 Februari 2016

Racking The Quilts Part IV


With all the shaping finally done for the Quilt Rack, it was time to sand. I used a combination of random orbit sanders and 3M Sandblaster sanding pads. I like the sanding pads because the foam backing keeps the pad rounded and prevents gouging or flattening the curves of the work piece. The sanding began with 80 grit and progressed to 180.
My finish sample board.
After sanding, I began experimenting with finishes. I took a scrap of Flame Yellow Birch which I had milled and sanded along with the quilt rack pieces. I ran blue tape down the middle and applied boiled linseed oil to one half and General Finishes Merlot Dye Stain to the other.
It was somewhere around this point that I was corrected regarding the due date. It turned out I only had one week until my mother-in-law’s birthday party, not two. I immediately abandoned my finish samples and got back to the business of assembling the quilt rack.
The cross members assembled to one leg.
I assembled the rack on my table saw so that I could rest in on a flat surface and ensure that it was square and wouldn’t rock. First I glued the cross members to one leg/foot assembly, then the other. As I was trying to push the second leg/foot assembly on, one of the Dominos gave me a hard time and wouldn’t slide into the cross member enough. Mid glue-up I pulled out a small pull saw and cut then end off the Domino. The leg/foot then fit on properly and I had an assembled quilt rack.
By sheer dumb luck, I was able to assemble the quilt rack
square on the first try with no tweaking.
I clamped the rack with one parallel clamp for each cross member. I had a few extra clamps ready to run diagonally across the quilt rack to counteract and racking, but all four foot points sat perfectly on the table saw with no racking present at all.
With the assembly done, I next moved on to finishing the quilt rack.
Read More..

Selasa, 23 Februari 2016

BenchMark Table Review

I typically do more home improvement then woodworking. Both are rewarding. Home improvement usually wins out because it address a specific need or deficiency that everyone in the house agrees about. To date, Im the only family member that finds deficiency with our furniture.
The BenchMark Table
When I work on home improvement (and woodworking) my shop usually spills out into my drivechoice. I typically schlepp wooden, metal or plastic saw horsed (I have all three) around from the back of the house where they live and create an ad-hoc work material support system.When I first read about the Benchmark table on ToolRank.com I immediately thought I’d found my solution. It was a collapsible aluminum table that could easily be setup in the drivechoice and maybe even the shop too.
The table, on arriving in the shop.
The table is a bit pricey ($350.00 to $500.00). At first I didn’t question the cost, I just needed to save up to get it. Following my birthday I put together all the Amazon gift cards I got (the only thing I’d asked for), added a bit of my own cash and pulled the plug on the table.
These are the plastic end caps which I broke a few of.
Once I received the table, I did second guess the price as I was assembling it. While the instructions are clear and easy to follow, the little green pieces that line the edge were a bit tricky to install. BenchMark is nice enough to include 4 extra, but I broke all of them during the installation. Because one of the cross pieces and the aluminum angle that makes the side weren’t lining up square to each other, I actually kept screwing right through the green plastic bit, tearing through it’s base. Even after I switched from a screw gun to a screw driver, I still damaged one. Finally, on the last little green plastic piece I went ever-so-gentle and managed not to break it. Luckily, it’s holding so well now that I’ve forgotten which one gave me so much trouble.This bit of frustration, on an otherwise easy assembly, did lead me to question the cost. For hundreds of dollars I was expecting an issue free assembly.
It fits, but it takes up just about all the currently free space in the shop.
I was also a bit disappointed by the relative size. In my one car garage shop, the table is big (64.25"L x 37.5"W) and not really practical to use (as I’d hoped it would be). However, when moved to the drivechoice, it shined.
The drivechoice is much less then flat. The adjustable feet make it easy to
keep the top of the table flat. They adjust in mere seconds.
When setup in my very uneven drivechoice, the table was very stable. The adjustable feet meant there was no wobble and I was easily able to adjust any twist out of the top.
A full sheet of any sheet good is handled with ease.
Once I threw a full 4’ x 8’ sheet of ¾” OSB on the table, I knew it was worth it. Since then, I’ve put full sheets, partial sheets and boat loads of PVC trim on the table. Through everything, the table has been absolutely rock solid. No matter what I’ve done with it, I’ve not been able to make it wobble. This was one of my prime concerns and the reason I’ve alchoices stayed achoice from the Festool Multi-Function Tables. I’ve played with MFTs many times in multiple stores, and they alchoices wobble.
It handles doors with east too.
Itll handle long boards too (with a touch of support).
I’ve now had the table for a bit more than 2 months. I’ve found that the table excels as a work surface. I don’t mean to suggest it’ll replace a real work bench, but as a surface to cut, drill and mark pieces and especially as a work surface for general home work (rather than fine woodworking) the Benchmark table is fantastic. If you find yourself needing to set up, breakdown and move your work table the Benchmark is the choice to go.Editors Note:Rusty asked to see photos of the table folded up (which I should have included originally). Thanks for the request, Rusty. Here is the entire photo gallery, including the table folded and in storage.
BenchMark Table
Read More..