 |
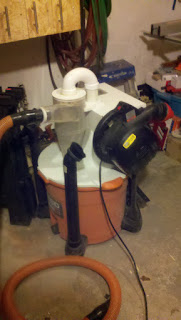
My Ridgid blower/vac
ClearVue Cyclone |
Hi. My name is Dyami and Im a Vacuumaholic. While Ive previously confessed my obsession with routers (Im now up to 9) I must also confess a somewhat smaller obsession with vacuums and dust collectors.
I have two (2) Dust Boy style dust collectors I picked up off Craigs list. Theyre both in the attic now, but an extension to the woodshop is planned to help fit them in. I also have a Ridgid portable "suitcase" style vacuum, a Shop Vac, a Ridgid Blower/Vac with Clear Vue Cyclone attachment and the requisite Festool CT22. Based on my current quasi completed shop setup, the Ridgid Blower/Vac with Clear Vue cyclone serves as the dust collection for my table saw, jointer & planer. It has a 16 gallon capacity, and I often fill it. Like you, I hate emptying it.
I hate emptying it so much that it got me thinking. While it would be much work to re-purpose the Clear Vue cyclone to fit a bigger container (and for what I paid for it, I dont think I could bring myself to modify it), Dust Deputy cyclones come as a kit and can be attached to any container. I ordered one and set to work.
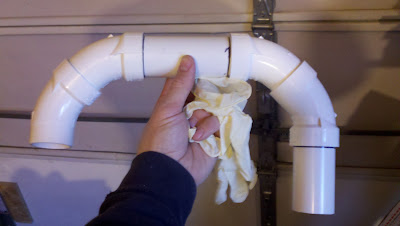 |
| My elbow assembly to prevent kinking the vacuum hose. |
Never one to shy achoice from over complicating a project, I decided that I needed to make some improvements on the suggest Dust Deputy set up. I began by picking up some schedule 40 PVC pipe and a few Ferncos. I wasnt happy with the idea of a vacuum hose kinking as it exists vertically from the top of the Dust Deputy. With the big elbow assembly I made, the hose now hangs from the PVC, eliminating the possibility of kinking.
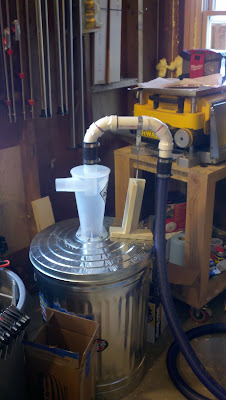 |
| My completed initial setup. |
I then had to decide on a container. As I own a full complement of sheet metal tools (I used to be a sheet metal mechanic at work) I began with a simple metal garbage can. I had Tom Iovinos tale of the metal garbage can dust collection in my head as I cut the top and fit the Dust Deputy, yet I failed to pay it any heed.
When I finished the metal bodied Dust Deputy setup I connected it to my CT22 and began to vacuum. Instantly I realized than on all but the weakest settings the CT22 would deform the metal can. At this point I scrapped the metal can installation and went looking for a more rigid dust collection bin.
We’ll reveal what I came up with in the exiciting conclusion of That Giant Sucking (and Crushing) Sound. Until then, what sucks so badly in your shop that you had to scrap it?
Read More..
This is a guest post by Chris Adkins of High Rock Woodworking. It originally appeared at highrockwoodworking.com. Feel free to check back there for more of Chriss woodworking rambling.
|
Hoffman & Hammer Workbench |
What is the best woodworking bench design? Well, I could end this here and say whatever is best for YOU, but I won’t.
In short that is the answer though, many of us get hung up on the style of the work bench we use whether it is a traditional woodworkers bench, carving bench, a door slab with legs under it, or maybe even a couple of saw horses to hold your work.
The traditional style woodworkers bench such as the Hoffman & Hammer Workbench shown above with its shoulder and tail vise, bench dogs for securing your work in place, and a solid heavy top for years of wear and tear is what I think of as the standard.
|
Scott Landis The Workbench Book |
But even a traditional workbench has no standard set of plans that all must follow, but great ideas can be gathered from books such as The Workbench Book by Scott Landis or search the internet to find hundreds for sets of plans, but styles vary depending on the primary purpose and what the woodworker wants.
Every woodworker has different needs that their workbench must meet. You may be a new woodworker that only builds basic bird houses and just need a flat surface to work off of. Or maybe you need a shoulder vise for clamping you work in place on occasion. Or you could mill all of your own lumber by hand and need a shoulder and tail vise to secure your boards in any number of choices to ensure you can plane and joint all faces of the board no matter the length.
For my own personal needs, I currently get by with my shoulder vise and a little help from my Veritas Bench Hold Down. But as I grow as a woodworker I can see where my needs are changing and requiring more complexity in the bench I use.
Tomorrow I will post part 2 of this series, until then keep woodworking!
Chris Adkins
Read More..


